

My Burger Joint Menu

What You'll Need
Please Print / Draw the Items:
This template pdf is FREE!
All we ask is that you spread the love for arts and crafts by sharing our website. Ready to dig in?

Get a copy of Burger Joint Menu Template pdf file
Also prepare these:
A3 Drawing Paper (1 piece)
Colour Pencils / Other Colouring Mediums
Acrylic Paint (optional)
Assorted Paint Brushes
Toothbrush (optional)
Black Marker
Pencils
Eraser
Glue
Scissors
Water in a Cup / Container
Paint Palette (optional)
Towel/Tissue Paper (optional)
Let’s Begin!
STEP ONE
Prepare the A3 paper and divide it into two parts by using a pencil. I will be using a medium-sized flat brush, a rounded tip brush and a toothbrush for today. Not to worry, you may use any flat and rounded tip brushes if you have at home! You can also choose your own colours for this part, but if you do want to achieve this beautiful starry night sky effect, keep reading!

STEP TWO
Paint the top half of the paper black, and the bottom half, blue! Next, blend the two colours together to form a beautiful night sky.

“How to blend?”, you might ask.
Well, all you have to do is to paint the top half black by moving your brush from the left to right, continuously. This will help create a smooth layer of paint. Start by applying a small amount of paint first and then add on if need. The next step is to wash you brush, towel dry it and paint the bottom half using dark blue. As you are painting from left to right or vice versa, move upwards and blend the two colours together. If unclear, the step is shown in our video as well. You might want to move a little fast as the two colours have to still be wet for you to blend it.
STEP THREE
Now it’s time to use a toothbrush! Wet the clean toothbrush in water, dip the tips with white paint and use your thumb to sprinkle the paint across the background. You may use any paintbrushes for this step if you do not own any toothbrushes as well! Now, leave your background aside for it to dry.

This will be the outcome of the dried painting. Lovely simple shades of blue and black that resembles the starry night sky.

STEP FOUR
Grab a black pen and start outlining the dotted lines that are already prepared for you in our kit. Look at the array of food choices! Feel free to draw out and add in your own food if you like.

STEP FIVE
Let’s trace the dotted lines of the printout paper using the same black marker. Ensure you follow the guidelines slowly and carefully to achieve a neat outline. Leave the outline of the menu logo aside first (circle).

Once you have traced all the dotted lines, your outcome will look something like this! Let’s get our colour pencils ready!


You can use any kind of colour pencils you have at home!
STEP SIX
Time to start colouring! Colouring is therapeutic and fun. The food items will look really yummy once they are coloured in.

STEP SEVEN
Next step is to prepare your scissors as we are going to cut these food items into individual pieces. Do be careful as scissors are sharp! Take your time to cut along the edges. Slowly but surely!
Now we are ready to move on to the next step!


STEP EIGHT
Once your background has completely dried, you may arrange your food pieces on top of it.

Arrange them as how you would like but wait a minute, something seems to be missing! A menu should have a logo of the café or restaurant so let us work on that now. You may have already joined the dotted lines earlier so let’s design our logo.
STEP NINE
In the huge circle, I have designed the logo by using my own name.
You may do the same or you can create your own café name!

STEP TEN
Let’s cut the piece out and arrange it in the centre of the whole artwork. Your food pieces may overlap the logo if you prefer it that way. Remember, there is no right or wrong answer! Enjoy the process and have fun!

Wow! We’re almost done!
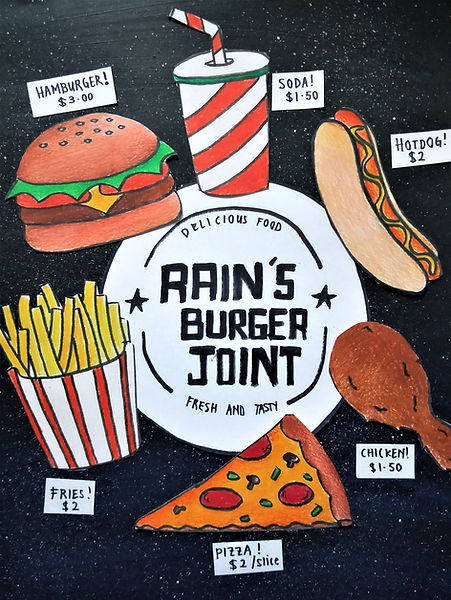
Now, we are going to be adding price tags to our menu.
This will allow the customers to know the cost of their food.
STEP ELEVEN
Fill in the prepared tiny rectangles with food names like “Burger”, “Pizza” and “Hot Dog” and write down the price of each of the food items.

STEP TWELVE
The last step is to re-arrange all of these price tags on your artwork. Once you have decided that all of them look great in their positions, you may start gluing each of the pieces down.

And there you go~
Show us your yummy menu too! Tag us on IG @ArtivityTime
I hope you enjoyed this Crafty Byte tutorial and continue to create wonderful artworks with us.
See you soon!